Thursday, October 8, 2015

Multiple IP Addresses on A Single Server


While running my experiments with IP Addresses and MAC Addresses, I found out something interesting today.


I was trying to print out Source IP Addresses and corresponding MAC Addresses of all the network packets that I receive in my system. But, I saw several packets, that are coming from outside servers, contain same MAC Address but different IP Addresses.


With a little bit of research, I found out, this is in fact quite a common practice for servers. In fact, if there are multiple services running on a single server, many a times those services are given different IP Addresses, so that, if in future any of the services is moved to a different machine, it can be done with minimum disruption.


So, if that is the case, then how to find out what all IP addresses are mapped to a single MAC address in the incoming network packets?


This is, in fact, very easy to find out. In fact, we can use tshark for this purpose.


I typed this command :


# sudo tshark -i eth0 -T fields -e eth.src -e ip.src -a duration:30


This command would give MAC Address and corresponding IP Addresses of each incoming network packets in the system, for a duration of 30 seconds.


The output would look something like this:


48:f8:b3:36:19:a1 74.125.200.189
48:f8:b3:36:19:a1 198.252.206.25
48:f8:b3:36:19:a1 74.125.130.188
48:f8:b3:36:19:a1 198.252.206.25
90:48:9a:f7:38:3d 192.168.1.121
48:f8:b3:36:19:a1 198.252.206.25
48:f8:b3:36:19:a1 74.125.200.189
90:48:9a:f7:38:3d 192.168.1.121
48:f8:b3:36:19:a1 198.252.206.25
90:48:9a:f7:38:3d 192.168.1.121
48:f8:b3:36:19:a1 216.58.196.110


Please note that, the MAC Address 48:f8:b3:36:19:a1 is mapped with different IP Addresses.


Well, this was a small interesting finding, which I wanted to share with you. Hope you found it interesting too!

Wednesday, October 7, 2015

SSH Key Authentication

Sometimes, we want to authenticate ourselves over SSH, but do not prefer to use passwords for authentication. Executing test scripts in a remote machine in an automated way, where we do not want to give passwords manually every time the local host connects with the remote host over SSH is just one such example.

But, how one should do that?


In this article, I would explain the steps from scratch using the example of executing automated test scripts in remote machine using SSH.


Installing SSH

I have a remote machine in my local network, having IP address 192.168.1.133. I would want to execute some local scripts in that machine and analyze the results. Both the systems are installed with Linux. So, I preferred using SSH.

Firstly, I would need to install ssh in both the machines.


# sudo apt-get install ssh


Now, I can login to the remote machine, from the local host.


# ssh user@192.168.1.133
Password:
#


I am able to login, the first step is done.


Copying test scripts in remote machine


Now, I would open another terminal and copy the local script to the remote machine.


# scp -p sample.sh user@192.168.1.133:/home/user/testsuites
Password:


Once I give the correct password, the script will be copied in the remote host.


Executing the test scripts in remote machine


Now, I would try to execute the script in the remote host.


# ssh user@192.168.1.133 /home/user/testsuite/sample.sh hello world
Password :
hello world


Here, the sample script looks something like this:


sample.sh

#!/bin/bash
echo -e "$1 $2"


So, if I execute the script with two command line arguments, it will print the arguments in a line.


Disadvantage of using passwords in SSH


I want to automate the whole procedure. i.e. I want to execute a script in my local machine, which would connect with the remote machine and execute the test scripts consecutively without any human interactions.


But, in the current setup there is a problem. I would have to give passwords every time the automated script residing in my local machine would connect to the remote machine for execution of any test script.


Using RSA Keys for authentication


If I use RSA keys for authentication in SSH, the problem would be solved. I would need to generate a RSA private-public key pair in my local machine and copy the public key to the remote machine over SSH. And then, every time my local machine would try to connect with the remote machine over SSH, the RSA keys will be used for authentication, instead of passwords.

The local host would first establish an SSH connection with the remote host and decide on the symmetric key using which the communication would be encrypted. And then, the local host would send the RSA key id. The remote host would verify the key id with the stored RSA public key and if matches, then the remote host would proceed with the authentication procedure.


Firstly, I would need to generate the RSA keys and copy the identification in remote host, so that while authenticating, it will use that information.


The steps are simple :

Firstly, I would generate RSA private-public key pair in my local host :


# ssh-keygen
Generating public/private rsa key pair.
Enter file in which to save the key (/home/user/.ssh/id_rsa):
Enter passphrase (empty for no passphrase):
Enter same passphrase again:
Your identification has been saved in /home/user/.ssh/id_rsa.
Your public key has been saved in /home/user/.ssh/id_rsa.pub.
The key fingerprint is:
******************* ad user@host
The key's randomart image is:
+--[ RSA 2048]----+
...
+-----------------+
#


Next, I would copy the identification in the remote host :


# ssh-copy-id user@192.168.1.133
user@192.168.1.133's password:
Now try logging into the machine, with "ssh 'user@192.168.1.133'", and check in:
~/.ssh/authorized_keys
to make sure we haven't added extra keys that you weren't expecting.


#

And, it is almost done.


Executing the test scripts


Now, I can execute the test script in the remote host without giving password every time my machine connects with the remote host :


# ssh user@192.168.1.133 /home/user/testsuite/sample.sh hello world
hello world


So, now you can follow the simple steps above to authenticate to a remote host over SSH without using a password. 

Tuesday, October 6, 2015

Analyze Your Network Traffic By Source IP Address : The Network Analyzer Version 2


If not redirected, please click here https://www.thesecuritybuddy.com/dos-ddos-prevention/how-to-analyze-sudden-increase-in-network-traffic/


In my last article (Detect Sudden Increase In Your Network Traffic), I showed how we can create a simple tool which can alert us when the system is having a sudden increase in network traffic.


In this article, I will show, if a system is getting an abnormal network traffic, then how we can analyze the traffic even further to see if the traffic is coming from some particular IP addresses.

So, let's start.


Analyzing network traffic by source IP addresses


This time we would need something more than a simple shell script. We would need to take help of some scripting language which is much more powerful.

Let's first discuss the idea using which we would be analyzing network traffic. Then probably we can decide on what scripting language we can use here.


How to solve the problem


Our job is a simple one. We need to analyze the network traffic in the system for certain intervals. And in each interval, we need to report, how much traffic is coming from which IP.


To solve the purpose, we need to find a utility which will give us list of IP addresses from which packets are coming. We can redirect it to an output file. The next module will take the file as input and analyze and report how much traffic has come from each IP.


The tools and scripting language


There are a couple of tools which can give us list of IP addresses from which network packets are coming. Tcpdump and tshark are a few of them.


For our purpose, we would be using tshark.


For Linux, you can install the utility easily.


# sudo apt-get install tshark


If you type the following command in the terminal, it will give you list of IP addresses from which network traffic is coming in each 15 seconds interval.


# sudo tshark -i eth1 -T fields -e ip.src -a duration:15


As I said earlier, we would be redirecting it to a file. And the next module can take the file as input and report how many network packets have come from each IP address.


Now, we should be deciding on the scripting language.


Using shell script is definitely going to be cumbersome. Instead we can use Python here. There is a simple and nice data structure in Python called 'Dictionary'. That would help us a lot.


Now, our job looks much simpler now. Using Python, we will open the output file, read each line from the file, and insert the IP addresses in the dictionary. And if an IP address comes multiple times, we will simply increase the count.


The script

We can use the following shell script first, which would invoke the Python code :


#!/bin/bash
while :
do
         sudo tshark -i eth1 -T fields -e ip.src -a duration:15 > ipfile
         python ip.py
done


This is really a short and simple one. It just uses the utility tshark, redirects its output to ipfile and calls the python program ip.py.


The Python code ip.py is given below :


#!/usr/bin/python
with open("ipfile", "r") as f:
    dict = {}
    for line in f:
        line = line.rstrip();
        dict[line] = dict.get(line, 0) + 1;
for x in dict:
print 'IP : ', x, '\tcount : ', dict[x];


The Python code opens the file ipfile, reads each line, strips the newline character at the end of each line and gets the IP address. Then it inserts the IP address in the dictionary, increasing count for multiple entries.


Running the script


If we run the code above, it will give you report about network traffic coming from each IP address.


Here is a sample output:


# ./ip_analyzer.sh

Capturing on eth1
91 packets captured
IP : 74.100.250.179 count : 5
IP : 200.84.22.26 count : 3
IP : 192.168.1.10 count : 42
IP : 91.179.89.25 count : 29
IP : 198.100.200.25 count : 2
IP : 192.68.1.1 count : 1
IP : 201.63.23.83 count : 1
IP : 72.100.188.135 count : 3


The script will throw outputs in each 15 second interval.


So, hope you have enjoyed reading about this small experiment.

Please feel free to share your comments and suggestions.

Detect Sudden Increase In Your Network Traffic : The First Step Towards Preventing Attack In Your System


If not redirected, please click here https://www.thesecuritybuddy.com/dos-ddos-prevention/how-to-detect-sudden-increase-in-network-traffic/


Be it a Ping Flood or SYN Flood or any other DoS attack, the first step towards detecting a DoS attack is detecting an anomaly in network traffic in your system. That is the first ever sign that can indicate your system may be having a DoS attack.

If you can monitor the network traffic in your system, and get informed about an anomaly well in advance, you can take action and probably, you still can prevent the attack.


In this article, I will show you, how to make your own tool of monitoring network traffic in your system that can alert you when there is a sudden increase in abnormal traffic.

Again, my system is a Ubuntu one, and here I will use, a simple utility called tcpstat along with shell script. Please note that, my intention is to show you a basic tool, based on which you can make your own IDS or IPS.


Firstly, you need to install tcpstat in your system.

# sudo apt-get install tcpstat


Now, run this simple command in your terminal :

# sudo tcpstat -i eth1

You may have to select appropriate network interface for your system.


You will see, in every 5 second tcpstat will give you few information like, number of network packets, bps etc.

This tcpstat has an option '-o' through which you can specify the output formatting.

Here, I will use the format “%n” which will give me number of packets in each 5 seconds.


Next, I will redirect the output in a file and in a while loop I will see the last line in the file, which gives, number of packets in last 5 seconds. And then, I will compare the number with a threshold.


I have experimented with few attacks, and determined the threshold to be 20,000 in my system.


Next, the job is simple. If the traffic goes beyond the threshold, set a flag. And if the increased traffic continues for a time, say, 15 seconds, I know, it is time for action to be taken. The action may be, setting a temporary new iptables rules or analyzing the traffic further.


So, how does the script look like? Please find it below.


#!/bin/bash
INTERVAL=0
sudo tcpstat -i eth1 -o "%n\n" > ofile &
while :
do
    sleep 5;
    THRESHOLD=`tail -1 ofile`
#echo "THRESHOLD is: $THRESHOLD"
    if [ $THRESHOLD -gt 20000 ]
    then
         flag=1
         ((INTERVAL=INTERVAL+1))
        if [ $INTERVAL -gt 3 ]
        then
            echo -e "Take Action!\n"
        else
            echo "Excess traffic"
        fi
    else
        flag=0
        INTERVAL=0
    fi


done


This was a very simple script, but you can use it for further improvement.
Hope you found it useful!

Friday, October 2, 2015

How Do Attackers Spoof IP Address by Changing Source IP Address of Outgoing Packets


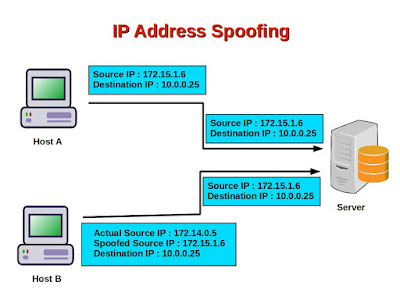
In one of my last articles, I explained, what is IP Address Spoofing. (What is IP Address Spoofing Attack ?  IP Address Spoofing attack )

In fact, in almost all cyber attacks, the attacker spoofs his IP address so that it becomes very difficult to catch the attacker.


But how do the attackers do that? How can they change IP address of outgoing IP packets?


Well, in this article, I am going to show you that. And again, I will show the methods for Ubuntu, because I use Ubuntu for experiments.

So, let's start.


I think, by now we all know about how to set Linux firewalls using iptables (How to configure Linux Firewalls using iptables ? how to set Linux firewalls using iptables.)

The firewalls (What is firewall ? firewalls) mainly, inspect all incoming and outgoing IP packets and accept or reject them based on some predefined rules.


In fact, using Linux iptables, we can easily change source IP of our outgoing packets. Iptables give us this option because it is very useful for network testing and diagnostics and security penetration testing.


We need to execute a single command, with root permissions, to do that.


# sudo iptables -t nat -A POSTROUTING -p icmp -j SNAT --to-source 192.168.1.121


This rule says, for packets using ICMP protocol, the source IP address will be changed to 192.168.1.121. This rule will be applied to outgoing packets, after they have completed the routing procedures in the machine and is about to be sent outside.


Now, before executing the command, I had seen all the IP addresses present in my local network using the command 'arp-scan'.


# sudo arp-scan -interface=eth1 --localnet
Interface: eth1, datalink type: EN10MB (Ethernet)
Starting arp-scan 1.8.1 with 256 hosts (http://www.nta-monitor.com/tools/arp-scan/)
192.168.1.1 48:8f:b3:63:20:a5 (Unknown)
192.168.1.120 07:63:97:c8:f1:c5 (Unknown)
192.168.1.133 00:1f:3a:bc:7b:58 Pr_Bc
192.168.1.138 cf:4b:63:7f:04:84 (Unknown)
192.168.1.117 cd:c5:eb:68:22:4b (Unknown)
5 packets received by filter, 0 packets dropped by kernel
Ending arp-scan 1.8.1: 256 hosts scanned in 1.289 seconds (198.60 hosts/sec). 5 responded


So, here the IP address 192.168.1.121 does not exist.


Now, I open the machine and type:

# ping 192.168.1.116


Can you guess what should be the outcome of this ping?

No reply. Because this IP address does not exist at all. So, the destination machine, with IP address 192.168.1.116 will receive the ping message and make an ARP query to find out what is the hardware MAC address of this IP. But, the machine will not get any reply and won't be able to respond to the ping's. As a result, the source machine, with IP address 192.168.1.133, will get no reply at all.


Let's do something different now. Let's delete this iptables rule and execute some different commands.


# sudo iptables -t nat -D POSTROUTING -p icmp -j SNAT --to-source 192.168.1.121
# sudo iptables -t nat -A POSTROUTING -p icmp -j SNAT --to-source 192.168.1.138So, we have deleted the previous rule from the machine with IP address 192.168.1.133 and added a new rule, so that, the source IP address of all outgoing ICMP packets are now 192.168.1.138.


Now, I would execute the ping command in the machine 192.168.1.133, where I have changed the iptables rules.

# ping 192.168.1.116


Will we get any reply now?

Well, no. Because we have pinged the machine 192.168.1.116 with a forged IP address. But the machine does not know that the source IP address of the packets are forged. So, it will send replies to 192.168.1.138.


In fact, if I do the same steps from multiple machines and change the source IP address of all outgoing ICMP packets to 192.168.1.138 and ping different machines, all the machines will send replies to 192.168.1.138 and will eat up all its bandwidth, causing a Denial of Service or DoS attack for the machine 192.168.1.138. Does it remind us of Ping Flood ? (What is Ping Flood ? Ping Flood)


Now, the most vital question will come to our mind,

Is it possible to know from the machine 192.168.1.116 that the ping messages it received were spoofed ones?

Let's try.


We would open Wireshark from a terminal.


# sudo wireshark

A window will appear similar to the below one.

Click on the interface you want to listen. In my case, it is eth1. And then, click on any ICMP message coming from 192.168.1.138.


If we click on Ethernet II, we see, source MAC address is 00:1f:3a:bc:7b:58. 

But from the 'arp-scan' output, we saw, the machine with IP address 192.168.1.133 has MAC address cf:4b:63:7f:04:84, which is an anomaly.


You can confirm the same with tcpdump also.


So, if the attacker forges the source IP address of his packets to contain the IP address of some machine within the victim's local network, then the victim can verify and find that out. 


But if it is not within the local network, then it is very difficult to find that out. Configuring a strong firewalls is always the best option.


So, in this article, I wanted to show you how IP address spoofing can be done easily. If you think it has helped you anywhere in thinking about safeguarding your system, I think my job is done.


So, stay safe, stay protected!